hui
Member
Jalan jalan, melihat artikel menarik... di posting aja dah.. manatau berguna buat reefer yang lain.. maaf ya karena nga diterjemahkan..
buat moderator terhormat, jika saya salah tempat posting, boleh dipindahkan...
The purpose of acclimation is simple: the water that the fish or corals are packaged in has different temperature, pH, and salinity parameters than your aquarium. Fish, and especially invertebrates (including corals), are very sensitive to even minor changes in these parameters, so proper acclimation is the key to ensuring their successful relocation.
We recommend either of the two acclimation methods explained below, and wish to remind you the acclimation process should never be rushed. Also, remember to keep your aquarium lights off for at least four hours after the specimens are introduced into the aquarium to help them further adjust.
Though not a requirement of our acclimation procedures, we highly recommend that all aquatic life be quarantined in a separate aquarium for a period of two weeks to reduce the possibility of introducing diseases and parasites into your aquarium and to ensure they are accepting food, eating properly, and are in optimum health before their final transition to your main display.
Floating Method
Turn off aquarium lights.
1. Dim the lights in the room where the shipping box will be opened. Never open the box in bright light - severe stress or trauma may result from sudden exposure to bright light.
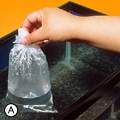
2. Float the sealed bag in the aquarium for 15 minutes (Fig. A). Never open the shipping bag at this time. This step allows the water in the shipping bag to adjust slowly to the temperature in the aquarium, while maintaining a high level of dissolved oxygen.
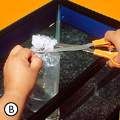
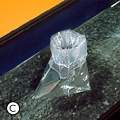
3. After floating the sealed shipping bag for 15 minutes, cut open the bag just under the metal clip (Fig. B) and roll the top edge of the bag down one inch to create an air pocket within the lip of the bag. This will enable the bag to float on the surface of the water (Fig. C). For heavy pieces of live coral that will submerge the shipping bag, place the bag containing the coral in a plastic bowl or specimen container.
4. Add 1/2 cup of aquarium water to the shipping bag (Fig. D).

5. Repeat step 5 every four minutes until the shipping bag is full.
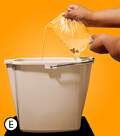
6. Lift the shipping bag from the aquarium and discard half the water from the bag (Fig. E).
7. Float the shipping bag in the aquarium again and proceed to add 1/2 cup of aquarium water to the shipping bag every four minutes until the bag is full.
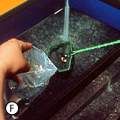
8. Net aquatic life from the shipping bag and release into the aquarium (Fig. F).
9.Remove the filled shipping bag from the aquarium and discard the water. Never release shipping water directly into the aquarium.
Drip Method
This method is considered more advanced. It is geared toward sensitive inhabitants such as corals, shrimp, sea stars, and wrasses. You will need airline tubing and must be willing to monitor the entire process. Gather a clean, 3 or 5-gallon bucket designated for aquarium use only. If acclimating both fish and invertebrates, use a separate bucket for each.
1. Start with Steps 1-3 of the floating method to acclimate water temperature.
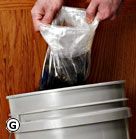
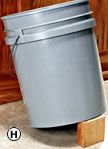
2. Carefully empty the contents of the bags (including the water) into the buckets (Fig. G), making sure not to expose sensitive invertebrates to the air. Depending on the amount of water in each bag, this may require tilting the bucket at a 45 degree angle to make sure the animals are fully submerged (Fig. H). You may need a prop or wedge to help hold the bucket in this position until there is enough liquid in the bucket to put it back to a level position.
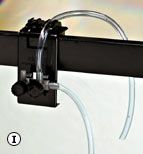
3. Using airline tubing, set up and run a siphon drip line from the main aquarium to each bucket. You’ll need separate airline tubing for each bucket used. Tie several loose knots in the airline tubing, or use a plastic or other non-metal airline control valve, (Fig. I), to regulate flow from the aquarium. It is also a good idea to secure the airline tubing in place with an airline holder. The Doctors Foster and Smith Acclimation Kit is a convenient alternative that simplifies the drip acclimation process.
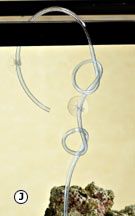
4. Begin a siphon by sucking on the end of the airline tubing you'll be placing into each of the buckets. When water begins flowing through the tubing, adjust the drip (by tightening one of the knots or adjusting the control valve) to a rate of about 2-4 drips per second (Fig. J).
5. When the water volume in the bucket doubles, discard half and begin the drip again until the volume doubles once more – about one hour.
6. At this point, the specimens can be transferred to the aquarium. Sponges, clams, and gorgonias should never be directly exposed to air. Gently scoop them out of the drip bucket with the specimen bag, making sure they’re fully covered in water. Submerge the bag underwater in the aquarium and gently remove the specimen from the bag. Next, seal off the bag underwater by twisting the opening, and remove it from the aquarium. Discard both the bag and the enclosed water. A tiny amount of the diluted water will escape into the aquarium; this is O.K. Also, to avoid damage, please remember never to touch the "fleshy" part of live coral when handling.
NOTE: Most invertebrates and marine plants are more sensitive than fish to changes in specific gravity. It is imperative to acclimate invertebrates to a specific gravity of 1.023-1.025 or severe stress or trauma may result. Test specific gravity with a hydrometer or refractometer.
Important Facts
1. Be patient - never rush the acclimation procedure. The total acclimation time for your new arrival should take no longer than one hour.
2. Always follow the acclimation procedure even if your new arrival appears to be dead. Some fish and invertebrates can appear as though they are dead when they arrive and will usually revive when the above procedure is followed correctly.
3. Never place an airstone into the shipping bag when acclimating your new arrival. This will increase the pH of the shipping water too quickly and expose your new arrival to lethal ammonia.
4. Keep aquarium lights off for at least four hours after the new arrival is introduced into the aquarium.
5. Most invertebrates and marine plants are more sensitive than fish to salinity changes. It is imperative to acclimate invertebrates to a specific gravity of 1.023-1.025 or severe stress or trauma may result.
6. Sponges, clams, scallops, and gorgonias should never be directly exposed to air. Follow the acclimation procedure, but instead of netting the specimen out of the shipping bag, submerge the bag underwater in the aquarium and remove the marine life from the bag. Seal off the shipping bag underwater by twisting the opening, and remove it from the aquarium. Discard both the shipping bag and the enclosed water. A tiny amount of the diluted shipping water will escape into the aquarium. Don't be alarmed; this will have no adverse affect on the tank inhabitants.
7. In some instances, your new tank mate will be chased and harassed by one or all of your existing tank mates.
[/quote]
buat moderator terhormat, jika saya salah tempat posting, boleh dipindahkan...
The purpose of acclimation is simple: the water that the fish or corals are packaged in has different temperature, pH, and salinity parameters than your aquarium. Fish, and especially invertebrates (including corals), are very sensitive to even minor changes in these parameters, so proper acclimation is the key to ensuring their successful relocation.
We recommend either of the two acclimation methods explained below, and wish to remind you the acclimation process should never be rushed. Also, remember to keep your aquarium lights off for at least four hours after the specimens are introduced into the aquarium to help them further adjust.
Though not a requirement of our acclimation procedures, we highly recommend that all aquatic life be quarantined in a separate aquarium for a period of two weeks to reduce the possibility of introducing diseases and parasites into your aquarium and to ensure they are accepting food, eating properly, and are in optimum health before their final transition to your main display.
Floating Method
Turn off aquarium lights.
1. Dim the lights in the room where the shipping box will be opened. Never open the box in bright light - severe stress or trauma may result from sudden exposure to bright light.
2. Float the sealed bag in the aquarium for 15 minutes (Fig. A). Never open the shipping bag at this time. This step allows the water in the shipping bag to adjust slowly to the temperature in the aquarium, while maintaining a high level of dissolved oxygen.

3. After floating the sealed shipping bag for 15 minutes, cut open the bag just under the metal clip (Fig. B) and roll the top edge of the bag down one inch to create an air pocket within the lip of the bag. This will enable the bag to float on the surface of the water (Fig. C). For heavy pieces of live coral that will submerge the shipping bag, place the bag containing the coral in a plastic bowl or specimen container.


4. Add 1/2 cup of aquarium water to the shipping bag (Fig. D).

5. Repeat step 5 every four minutes until the shipping bag is full.
6. Lift the shipping bag from the aquarium and discard half the water from the bag (Fig. E).
7. Float the shipping bag in the aquarium again and proceed to add 1/2 cup of aquarium water to the shipping bag every four minutes until the bag is full.
8. Net aquatic life from the shipping bag and release into the aquarium (Fig. F).
9.Remove the filled shipping bag from the aquarium and discard the water. Never release shipping water directly into the aquarium.
Drip Method
This method is considered more advanced. It is geared toward sensitive inhabitants such as corals, shrimp, sea stars, and wrasses. You will need airline tubing and must be willing to monitor the entire process. Gather a clean, 3 or 5-gallon bucket designated for aquarium use only. If acclimating both fish and invertebrates, use a separate bucket for each.
1. Start with Steps 1-3 of the floating method to acclimate water temperature.
2. Carefully empty the contents of the bags (including the water) into the buckets (Fig. G), making sure not to expose sensitive invertebrates to the air. Depending on the amount of water in each bag, this may require tilting the bucket at a 45 degree angle to make sure the animals are fully submerged (Fig. H). You may need a prop or wedge to help hold the bucket in this position until there is enough liquid in the bucket to put it back to a level position.
3. Using airline tubing, set up and run a siphon drip line from the main aquarium to each bucket. You’ll need separate airline tubing for each bucket used. Tie several loose knots in the airline tubing, or use a plastic or other non-metal airline control valve, (Fig. I), to regulate flow from the aquarium. It is also a good idea to secure the airline tubing in place with an airline holder. The Doctors Foster and Smith Acclimation Kit is a convenient alternative that simplifies the drip acclimation process.
4. Begin a siphon by sucking on the end of the airline tubing you'll be placing into each of the buckets. When water begins flowing through the tubing, adjust the drip (by tightening one of the knots or adjusting the control valve) to a rate of about 2-4 drips per second (Fig. J).
5. When the water volume in the bucket doubles, discard half and begin the drip again until the volume doubles once more – about one hour.
6. At this point, the specimens can be transferred to the aquarium. Sponges, clams, and gorgonias should never be directly exposed to air. Gently scoop them out of the drip bucket with the specimen bag, making sure they’re fully covered in water. Submerge the bag underwater in the aquarium and gently remove the specimen from the bag. Next, seal off the bag underwater by twisting the opening, and remove it from the aquarium. Discard both the bag and the enclosed water. A tiny amount of the diluted water will escape into the aquarium; this is O.K. Also, to avoid damage, please remember never to touch the "fleshy" part of live coral when handling.
NOTE: Most invertebrates and marine plants are more sensitive than fish to changes in specific gravity. It is imperative to acclimate invertebrates to a specific gravity of 1.023-1.025 or severe stress or trauma may result. Test specific gravity with a hydrometer or refractometer.
Important Facts
1. Be patient - never rush the acclimation procedure. The total acclimation time for your new arrival should take no longer than one hour.
2. Always follow the acclimation procedure even if your new arrival appears to be dead. Some fish and invertebrates can appear as though they are dead when they arrive and will usually revive when the above procedure is followed correctly.
3. Never place an airstone into the shipping bag when acclimating your new arrival. This will increase the pH of the shipping water too quickly and expose your new arrival to lethal ammonia.
4. Keep aquarium lights off for at least four hours after the new arrival is introduced into the aquarium.
5. Most invertebrates and marine plants are more sensitive than fish to salinity changes. It is imperative to acclimate invertebrates to a specific gravity of 1.023-1.025 or severe stress or trauma may result.
6. Sponges, clams, scallops, and gorgonias should never be directly exposed to air. Follow the acclimation procedure, but instead of netting the specimen out of the shipping bag, submerge the bag underwater in the aquarium and remove the marine life from the bag. Seal off the shipping bag underwater by twisting the opening, and remove it from the aquarium. Discard both the shipping bag and the enclosed water. A tiny amount of the diluted shipping water will escape into the aquarium. Don't be alarmed; this will have no adverse affect on the tank inhabitants.
7. In some instances, your new tank mate will be chased and harassed by one or all of your existing tank mates.
[/quote]


